How to Make a Fondant Baby Owl for Cake
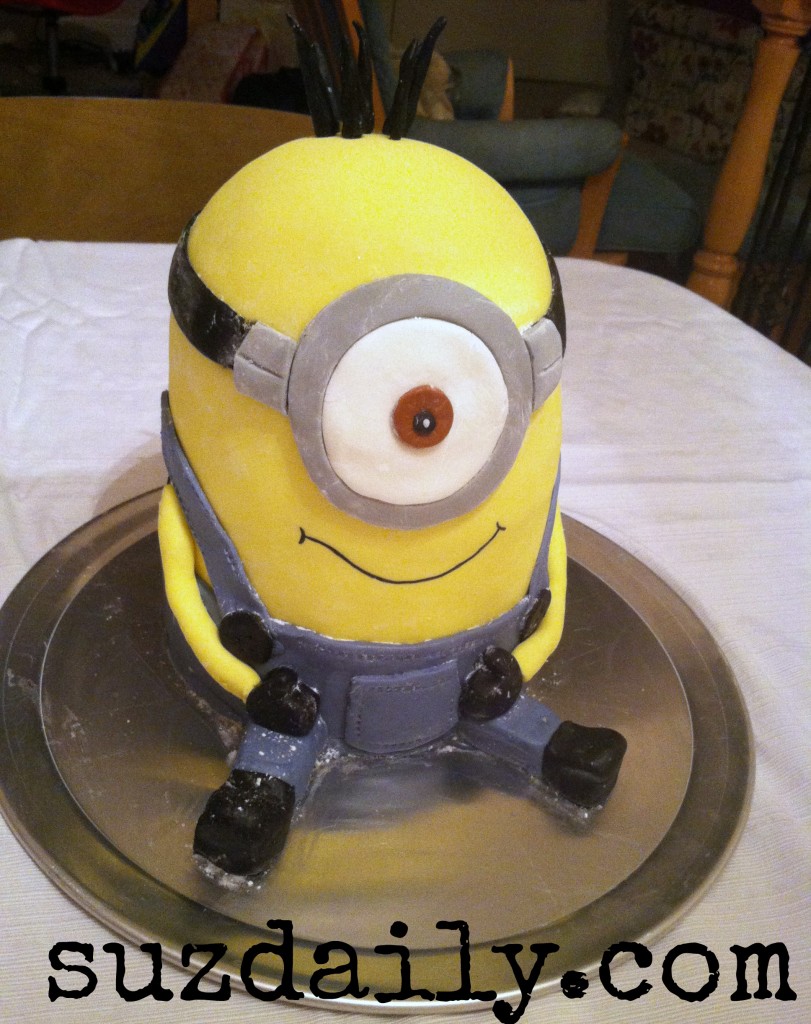
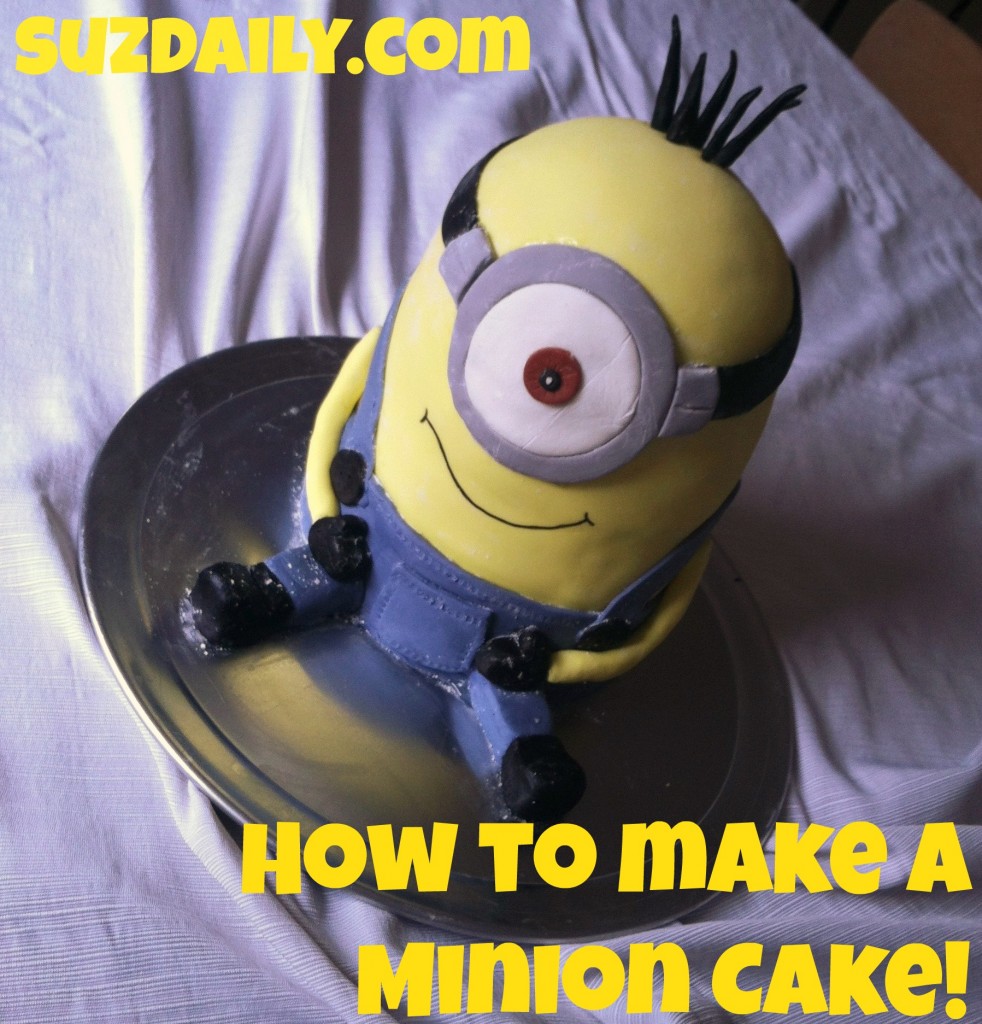 Matilda turned eight this Autumn! I can't believe it. All she wanted to eat on her birthday was a minion cake! With a two-month one-time at this was quite the challenge! After lots and lots of thought and tedious calculation I finally created a template for a 3-D minion cake. I took plenty of notes back in September and finally have a free moment (baby is sleeping zzz…) to share the instructions. I hope this tutorial helps to make someone else'due south altogether special! Besides, who doesn't dear Minions?
Besides, please run into my other post – information technology is much more DETAILED – HOW TO MAKE A PURPLE MINION CAKE! CLICK Here!
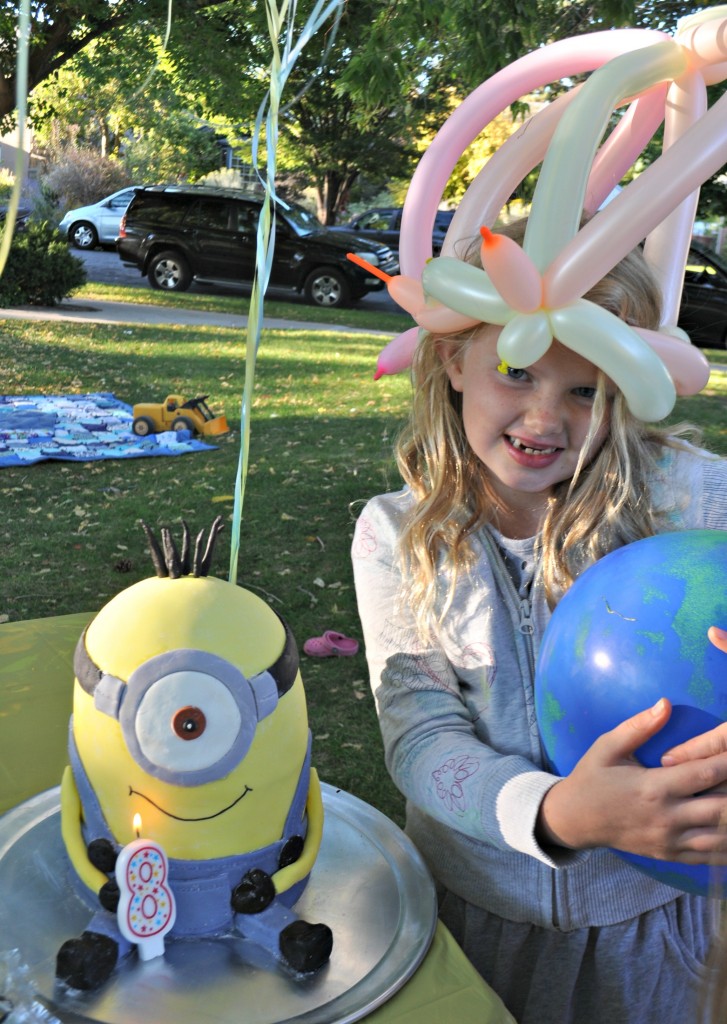
Matilda you are the sweetest little girl! Please please don't grow up! xoxo -Mom
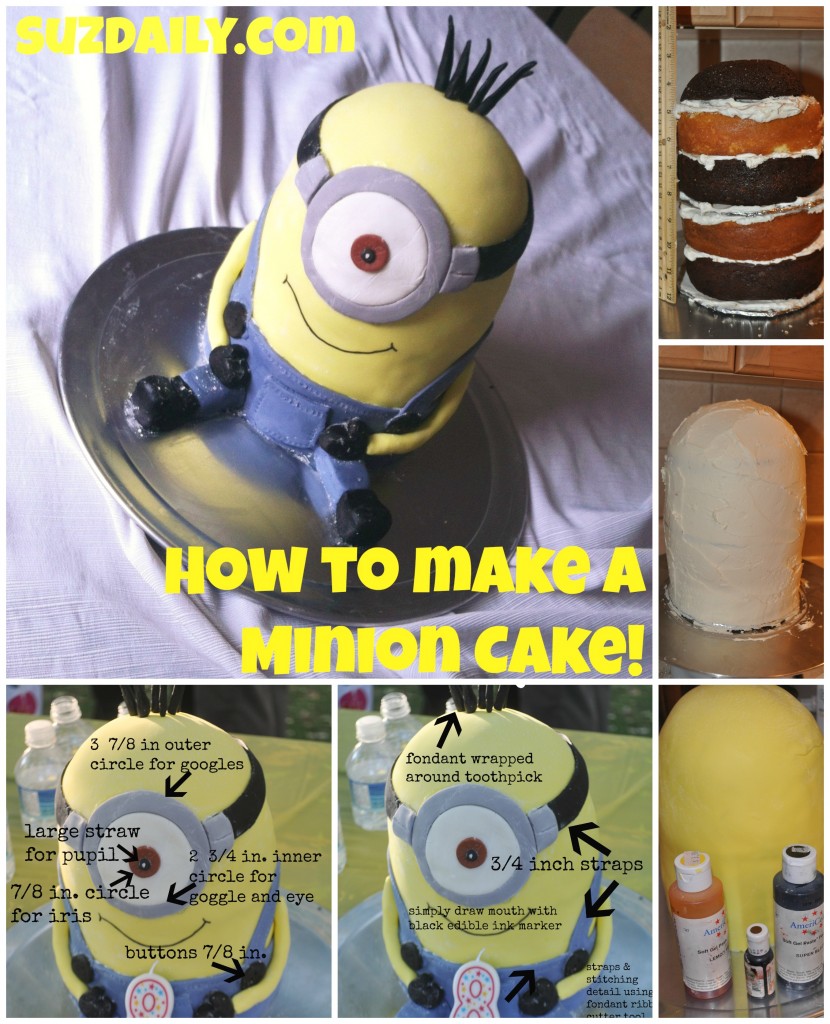
Keep reading for a detailed tutorial with lots of photos!
How to Brand a Minion Cake: Applied Advice
Do not make the aforementioned mistakes I brand… so here is some free applied advice for making this minion block. First, do not expect to do all this work in ane night. Yes, I did! It was a crazy weekend! I started the block at 8PM after my kids went to bed and finished the cake at 3AM the day of my daughter's birthday. Luckily, I hit Michael'due south the day before making the cake for a few missing colors and the half dozen inch blistering pans. I only happened to have an oven safe bowl for the dome part of the minion's caput.
If possible, set up the buttercream and cakes a day or two in advanced. Wrap the cake layers for the minion in saran wrap and freeze until ready to utilize. This saves a lot of time when assembling and decorating the cake. I have seen way too many Cake Dominate episodes and forget that I don't accept a 20 person staff to help me out.
Marshmallow fondant tin can exist made in advanced but in my climate it dries out very apace. Too, don't worry too much almost perfection with your little minion cake. After watching Despicable Me over 100 times I realized minions come up in all shapes and sizes and then the layers of cake practice not have to be exactly the size that I have outlined. I actually doubt I have an ounce of artistic power so I used a coloring folio online to come out with the proportions used in this tutorial. I am much meliorate at Geometry – there was a lot of math involved in coming up with this design.
In the end, after all the stressing the cake was not 100% perfect – but this happy little minion block was devoured in moments and the kids LOVED information technology! So merely enjoy the process. There may be bumps and wrinkles in your minion cake but but let it go and take fun! I permit my x year sometime daughter stay up until 1AM to help out. Kids LOVE this! So enjoy the minion cake journey! Oh yes, don't be overwhelmed by the list of supplies, I am simply trying to remember everything.
Footstep one : How to Make a Minion Cake – Get together supplies
Checklist: Supplies needed for a Minion Cake
- at least two half dozen inch round cake pans
- one oven prophylactic dome shaped basin with approximately 6 inch circumference
- ii six inch paper-thin rounds – 1 of which has a i inch pigsty cutting in the center – be certain they are at least 1/4 inch larger effectually then the baked cake
- 4 six inch round parchment paper rounds
- yellowish food dye (I used Americolor lemon yellow)
- blackness food dye (Americolor super black)
- brown food dye (Americolor brown)
- denim color blueish (Wilton delphinium bluish)
- nutrient prophylactic marker (Wilton black)
- bamboo skewers or other back up for cake construction – cut four near 3 1/two inches , cut one 8 i/2 inch
- toothpicks for supporting minion artillery and minion hair
- Circular cookie cutter measuring iii 7/8 inches, for outside edge of goggle (found in Ateco set of round cookie cutters)
- Round cookie cutter measuring ii iii/4 inches, for cutting inside edge of goggle (Ateco round ready over again)
- Minor circular cookie cutter measuring 7/eight inch, for cutting the iris of the minion heart and too for cut the buttons
- Large gas station harbinger for cutting the black pupil
- Wilton or other tool set for cutting three/4 inch straps for overalls and the goggle strap
- Wilton tool for pressing stitch design into the overalls
- Wilton silvery pearl dust (to pigment over goggles… I skipped this footstep but it would look crawly!)
- lemon extract or vodka for painting the goggles silver
- two cakes mixes, broiled using the following recipe for 3D cakes – once more make 2 batches to fill the total four half dozen in cakes and the small-scale dome cake for the superlative
- one batch fluffly buttercream, recipe plant here – or other stable buttercream icing of your choice
- 2 batches marshmallow fondant, recipe constitute here, or ready fabricated fondant from a block supply store
So let's make a minion block!
Step two : How to Brand a Minion Cake – Bake the cake layers
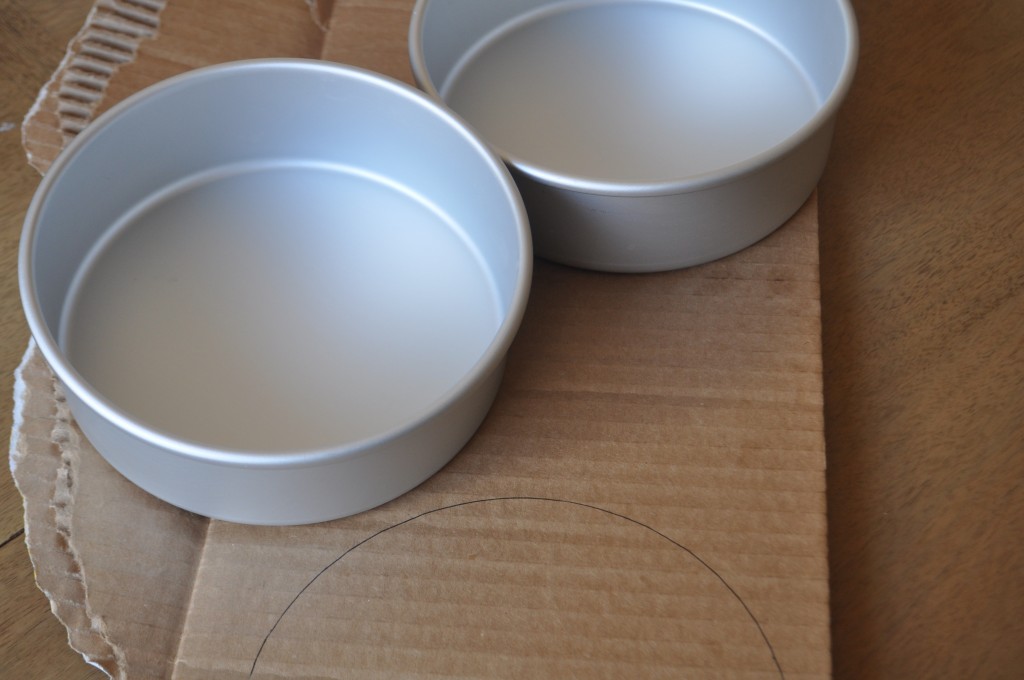
Thank you Michael's Craft Stores for the 40% off coupons. I was able to observe six in block pans. I was in budget mode so instead of buying the paper-thin rounds (maybe merely $0.l each?) I traced the pinnacle of my cake pans and covered them in aluminum foil. I measured from the top of the cake pan because I wanted the cardboard rounds to be slightly larger than the cake itself. We need to allow room for the icing. In one I made a circle in the center then that a large bamboo skewer support could go through the entire length of the cake. More on this subsequently. Now you are fix to Bake your Minion Block!
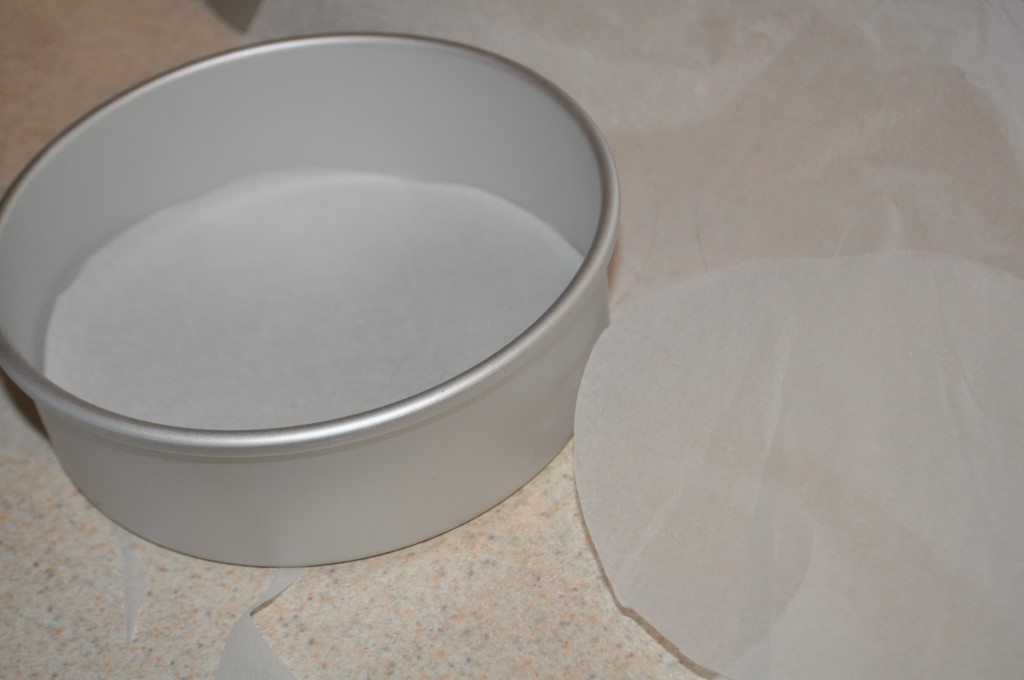 Cut parchment rounds half dozen inches using the cake pan equally a guide. Practise not attempt to broil your cake with out a layer of parchment paper at the bottom. It is a lifesaver! Identify the parchment rounds at the bottom of the cake pan and coat generously with cooking spray. Bake four half dozen inch round cakes as directed in the following recipe – there will be extra batter for the dome portion of the block and possibly even a little leftover for mini cupcakes. If desired use your favorite recipe, just make certain that it produces a sturdy cake that tin exist stacked. Nosotros did 2 chocolate layers and two yellow block layers.When the six inch round cakes have cooled, trim each one so that they are ane.5 inches high. The round dome portion should measure about 2 inches at the highest point. This does not have to be exact.
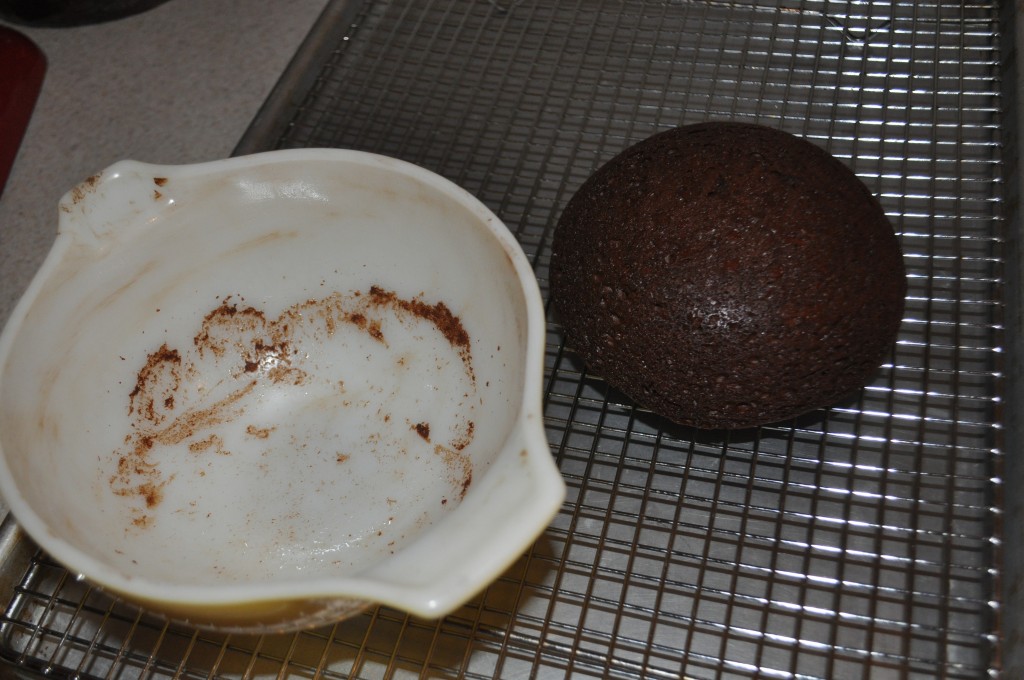
Here is the bowl I used for baking the dome portion of the cake. This is a vintage pyrex bowl I found at a yard sale a long time agone. I never knew information technology would come up in handy for this cake! If I didn't have this perfect basin I would simply bake another six inch circular cake and piece it to make the dome shape for the top of the minion cake. Rice crispy treats could also utilize for this office of the cake. I lucked out with this pyrex bowl.
Step iii : How to Brand a Minion Block – Frost the block and construct the minion cake body using buttercream
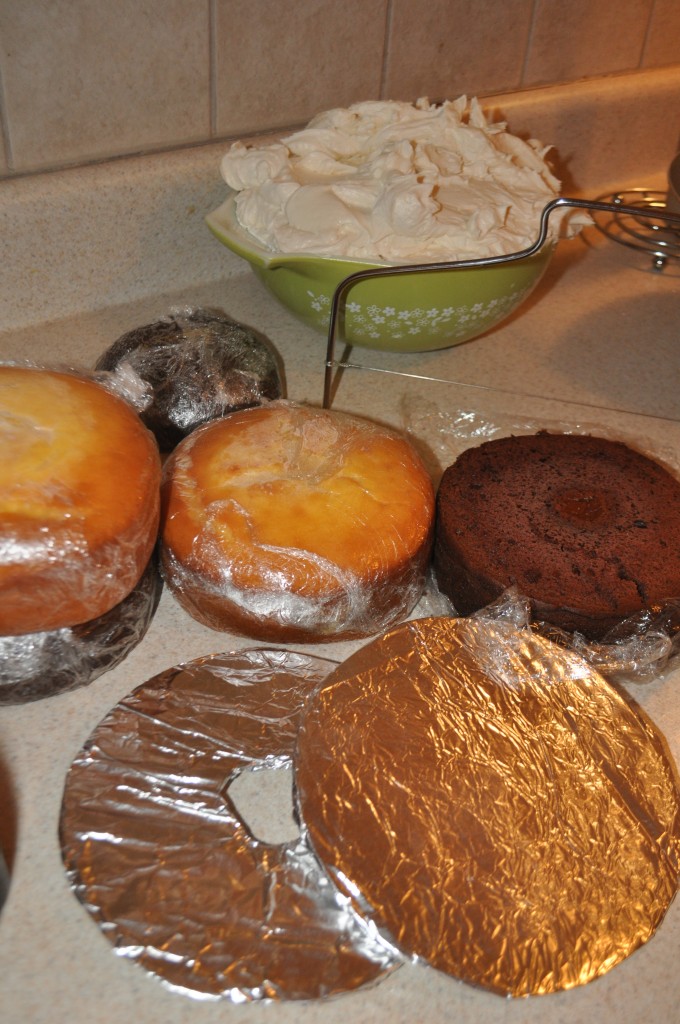 I am ready to become! In this motion picture I am trimming the round cakes so that they measure about i.5 inches high. An inexpensive Wilton cake leveling tool does the job. Note I have the buttercream ready to go (I fabricated way likewise much that twenty-four hour period). I also accept 2 foil covered rounds that will be used in constructing the minion cake. Discover that the second round has a small hole in the center.
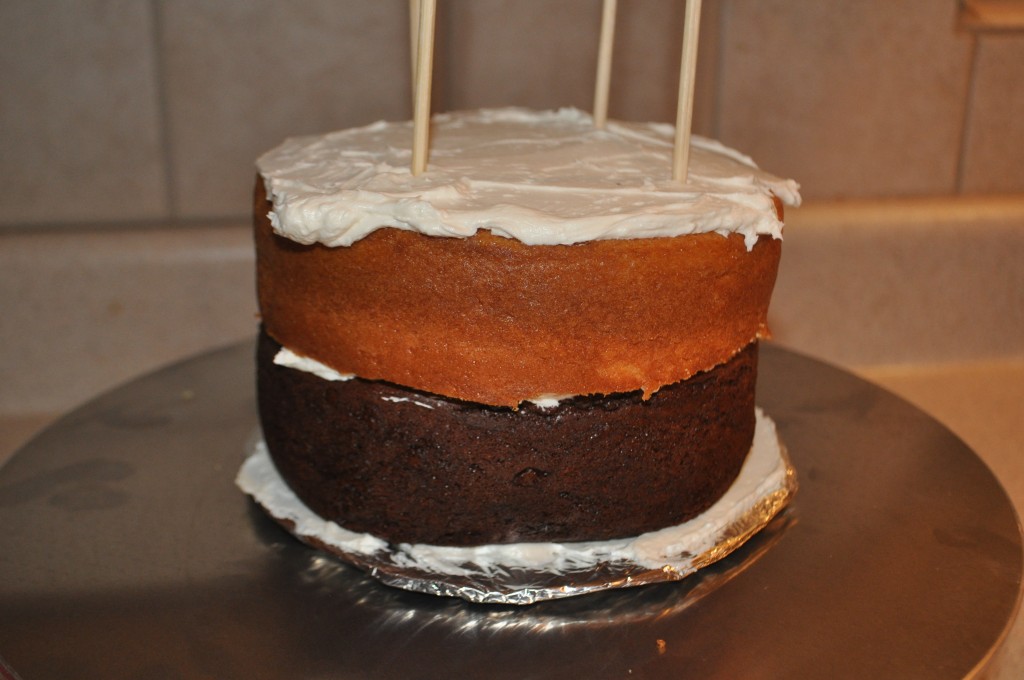
This part is so fun! Place a layer of icing on the foil covered paper-thin circular. Next comes the first block layer. Again, these layers of the minion cake are fabricated from 6 inch round block pans and trimmed to 1.5 inches high. After that first chocolate layer I added a thick layer of buttercream. On tiptop of that, a yellow cake layer and more icing.So basically, icing, block, icing, cake, icing. As you tin can run into above I place 4 skewers into the two cake layers about ane inch from the border of the block. Why am I adding bamboo skewers? Because our minion cake needs BONES! Some cheap support. After the bamboo skewers are placed into the two layers of block I trim them so the tiptop is nearly 1/eight inch below the buttercream. Y'all could use fancy supports from a block decorating store – but for me the bamboo skewers work fine. But remember to look for them when yous are cutting and serving the cake.
Afterwards the bamboo skewers are added gently place the 2d cardboard circular on peak of the icing and the skewers. This cardboard should remainder on the skewers then that the skewers tin can hold the weight of the adjacent three layers of block and icing. Find that the cardboard rounds are slightly larger than the cakes. This allows room for a thick layer of buttercream icing.
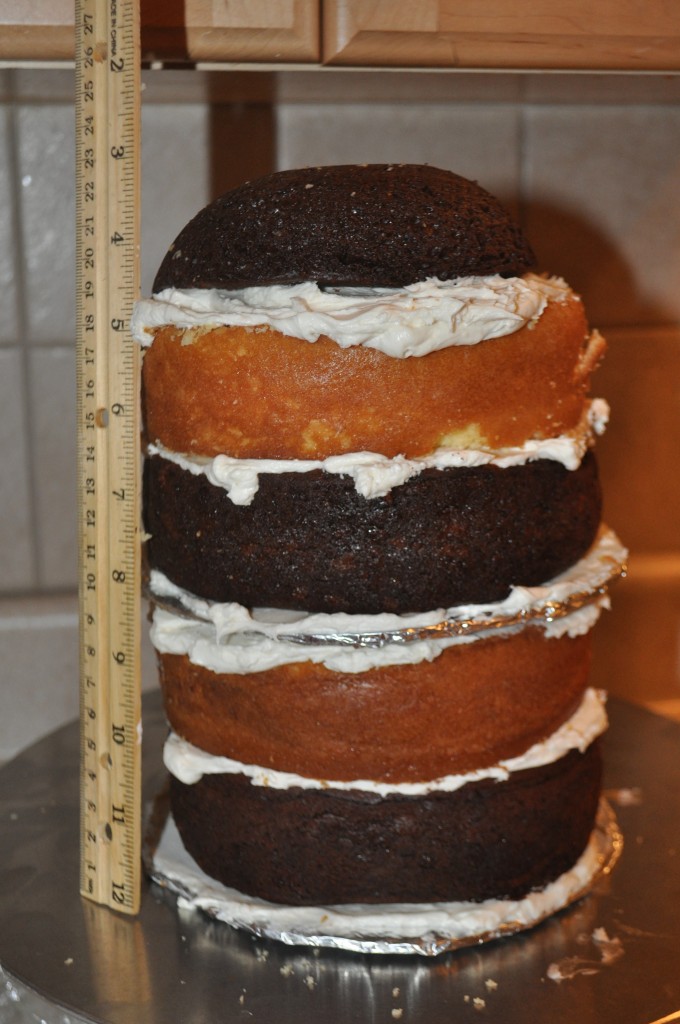
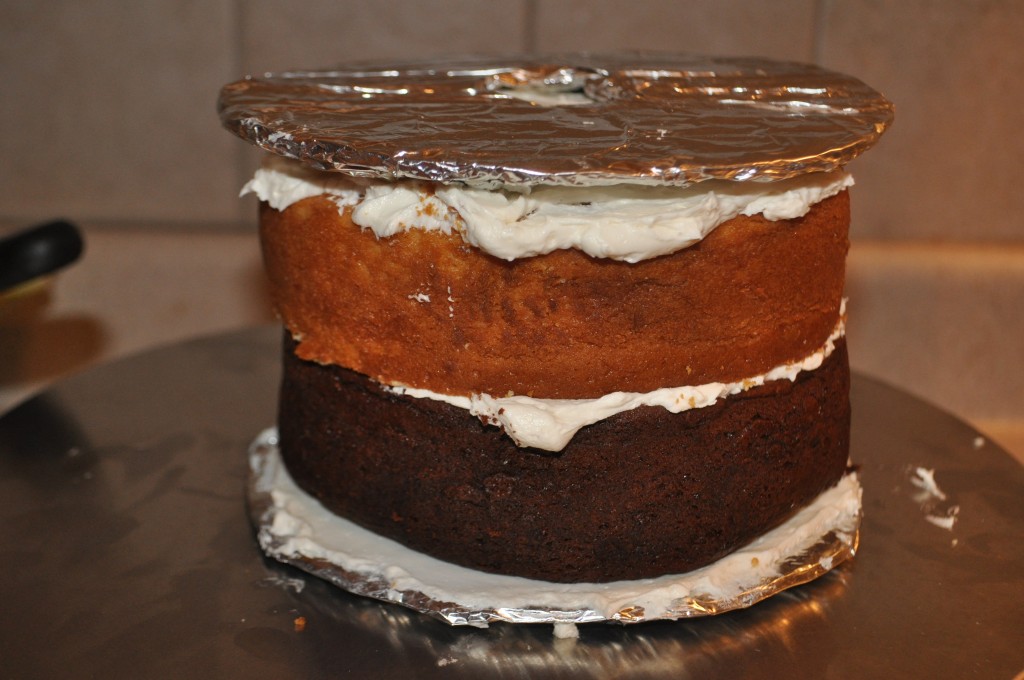
Proceed by adding in this order; buttercream, cake round, buttercream, block circular, buttercream, pocket-sized dome-shaped cake. As you tin can see the final height of the minion cake will be effectually 9.iii inches – a very manageable size for a stay-at-home-mom bakery. The minion cake is starting to take shape.
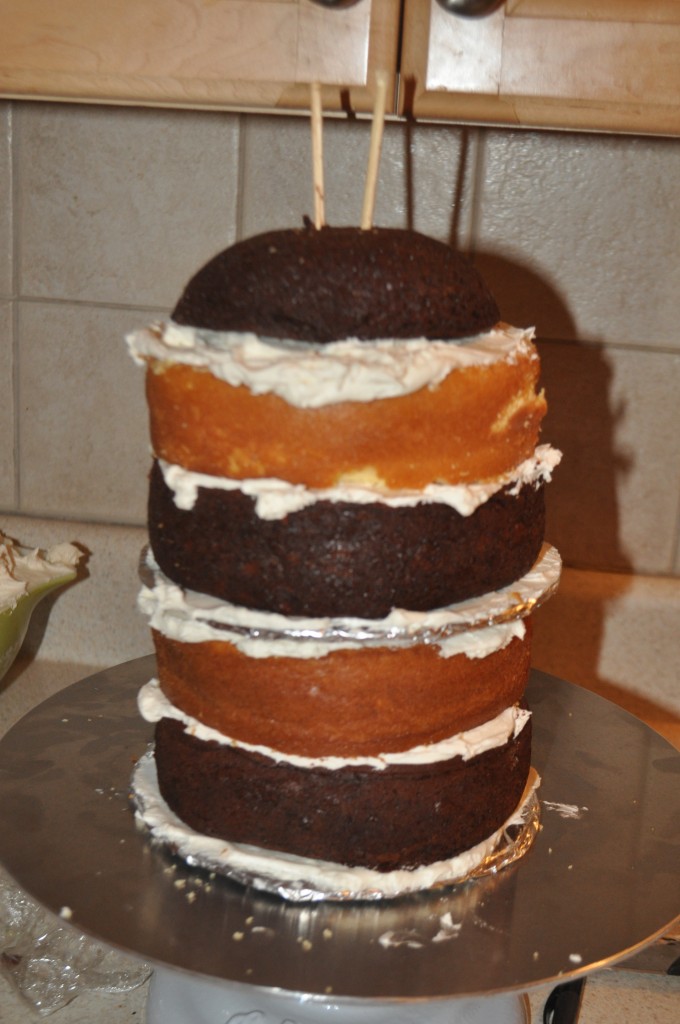 I next insert two bamboo skewers into the layers of cake to keep the entire minion block together. Trim merely beneath the last layer of buttercream. Once more, take note of the placement for when yous are serving the block.
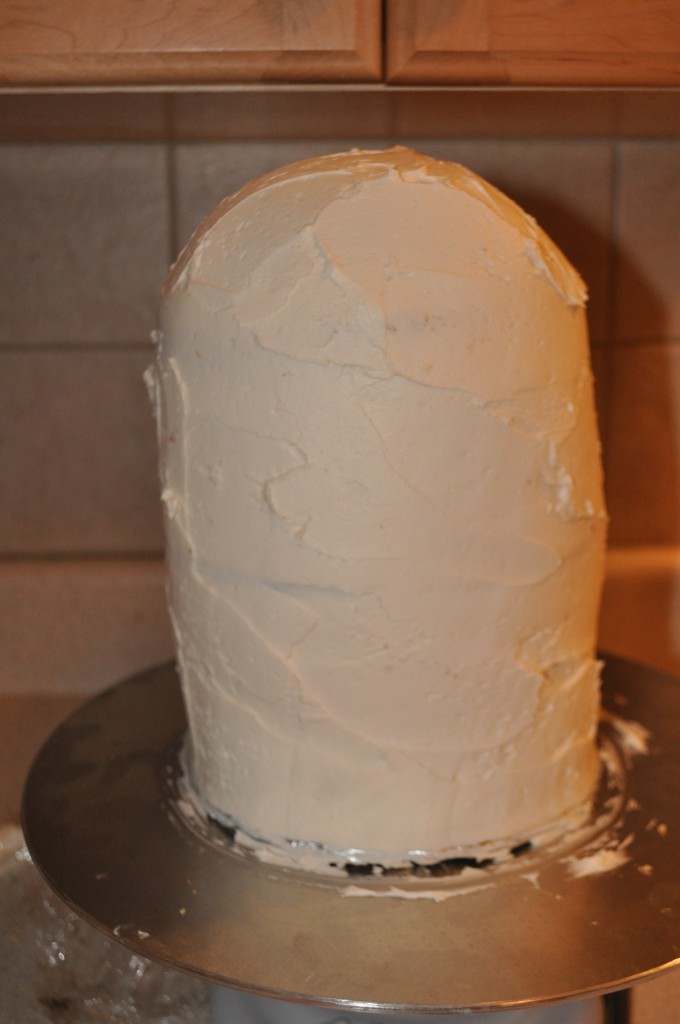
At present slap on that first layer of icing – yes the nibble layer so that the entire minion cake is covered in icing. Place the cake in the fridge to cool as you clean upwardly or work on the fondant… or even better yet – end here and salvage the decorating for the next day!!One time this layer of icing has cooled add together an additional layer of icing, nice and smoothen. Remember the fondant will just look as pretty as the buttercream layer underneath it…. I simply thought of a unproblematic shortcut – add together yellow food dye to the buttercream and make that the minion peel. Not every bit professional person looking but would still be very beautiful!
Stride iv : How to Make a Minion cake – Prepare and Decorate with Fondant
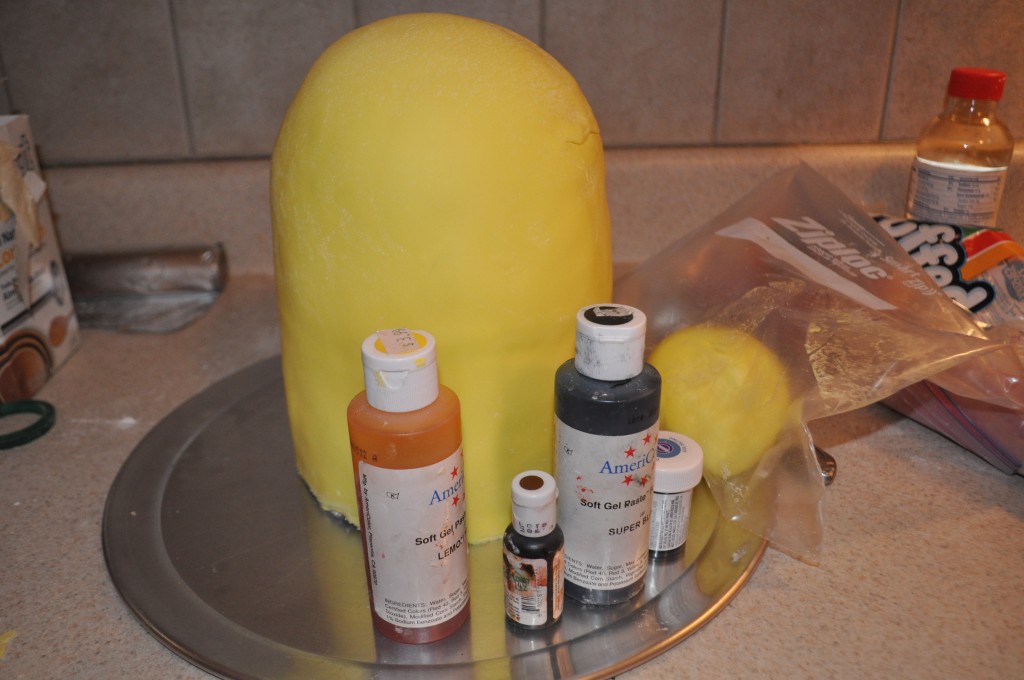
Every bit stated above, you volition need two batches of the marshmallow fondant recipe. Dye one entire batch yellow for the minion skin, including artillery. The second batch of marshmallow fondant should be dyed as follows – about 2/three of the batch in delphinium blue with a little bit of blackness for the overalls, about 1/iv of of the batch black for the mittens, boots, buttons, and other details. The remainder should be split up betwixt white and grey. White fondant for the middle. And a modest bit of grayness fondant for the goggles.(apply the smallest corporeality of black to get grey). Save a small slice of fondant to cut the 7/viii brown middle.
If you have never worked with marshmallow fondant before I would do a practice round a couple weeks earlier the party. It is very fun, only stressful if you are running out of time.
Roll out the fondant either using the dry out method (cornstarch) or using shortening on the rolling pin and counters. I prefer to use corn starch to coil out the fondant considering it is easier to make clean upwards. You will need a large slice of yellow to comprehend the unabridged minion cake. This large slice of yellowish fondant minion skin should mensurate well-nigh 12 inches high by 20 inches broad. Carefully place the fondant over the minion cake and smooth using fondant tools. The back of my cake is sort of a mess – why? Considering this is for fun, and I tend to work quickly at this stage in making the cake. No one cares what the back of the cake looks like! Seal the yellowish fondant together and cutting the edges to fit around the base of operations of the minion.
Progress! The minion is almost prepare to go! At present simply cut out the rest of the details and place on the cake. I am able to use just a bit of water to get the fondant details to stick. If necessary use corn syrup or piping gel to get the details to stick to the base of the minion block.
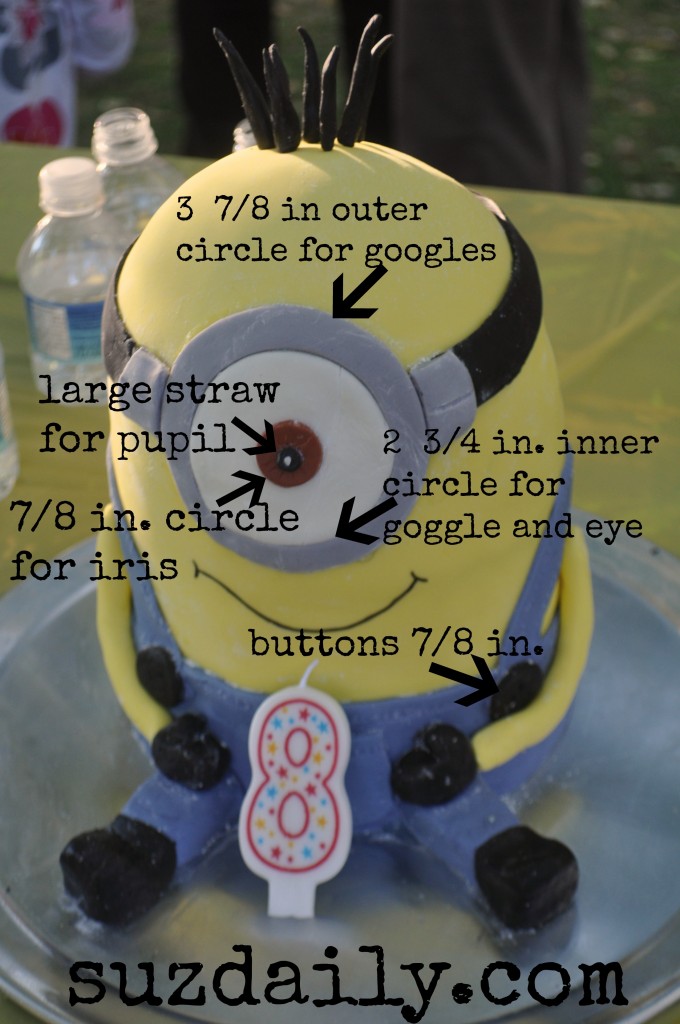
Cutting out the pieces for the goggle offset. Use the sizes listed in the photo higher up. I found it helpful to permit the cut pieces sit on the counter for a few minutes to dry out before placing them on the cake. When I rushed, the eye started to sag and loose it'southward circle advent. Also cutting out the 7/eight inch buttons to exist used later.
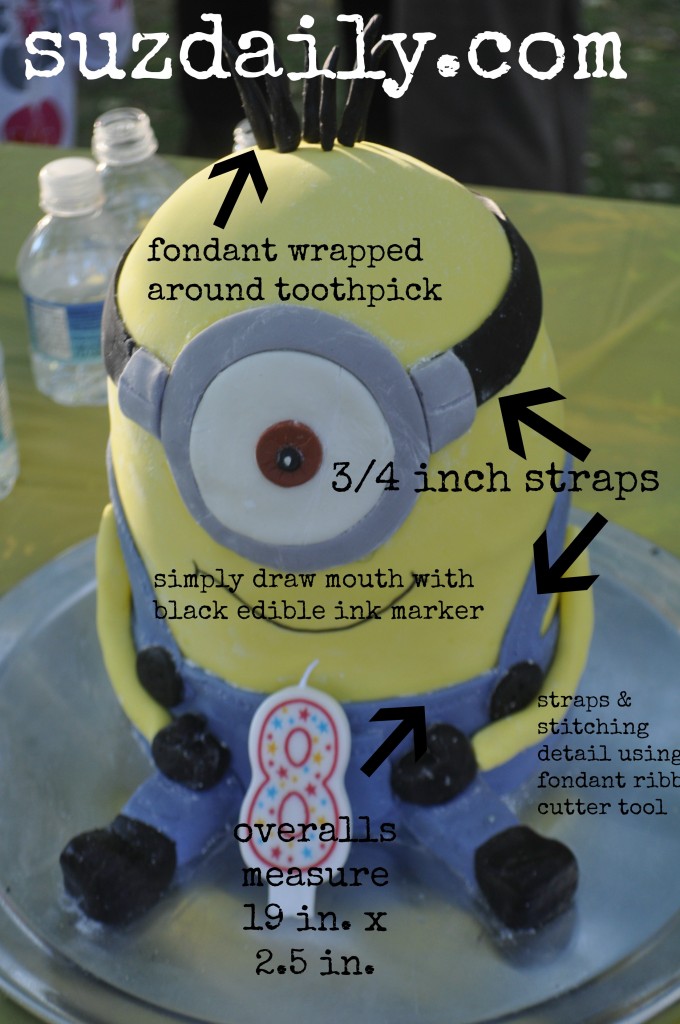
Wrap black fondant around the toothpicks to create the minion hair. I could have made more. Prepare a big 19 inch by 2.v inch rectangle of the blue for the base of the overalls. Employ a fondant ribbon cutter gear up at three/4 inch to cut long strips of fondant for the goggles and the overall straps. Add sew details using the aforementioned ribbon cutter tool. Secure arms and legs using toothpick that come out of the side of the minion block. Simply play around with the fondant as if information technology were modeling clay or play dough – this should be fun! Last place the buttons and the pocket on the minion block.
The final pace was to add together the cute smiling on the minion block using a black edible ink mark. And then fun! I am available for questions so permit me know if I left something out.
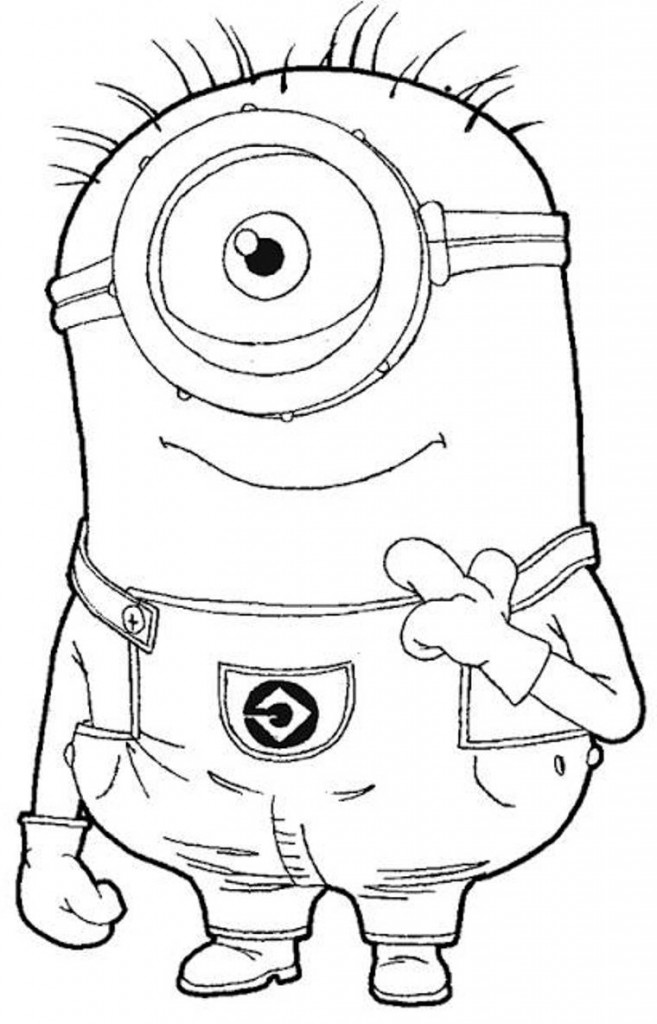
Here is the minion image I used to get my measurements for the minion goggles. I really hope you are able to recreate this minion cake. Enjoy!
Essential tools and supplies

Source: https://www.suzdaily.com/2014/01/how-to-make-a-minion-cake.html
0 Response to "How to Make a Fondant Baby Owl for Cake"
Postar um comentário